A tale about a giraffe...
Meet Twinka. Named by our amazing housekeeper, Dollah - who got a front-row seat to the painstakingly lengthy development of this massive thing in our living room. She couldn’t think of what a giraffe is called in her language, so she sent pictures to her family in Malawi. Her dad reported back that he knows it as “twiga”, apparently meaning ‘long neck’ (Google relays that it’s Swahili for giraffe). But I misheard Dollah, and the slightly altered ‘Twinka’ just kind of stuck!
From the first sketch of Twinka’s face, to the day that she stood proudly (and super tall!) in our living room, took a whopping six months!

As an extension of our Wooden Animal Mask range, I approached the design in the same way:
- Sketch
- Scan the sketch
- Draw in Adobe Illustrator
- Resize to desired dimensions & print
- Create cardboard templates
- Use those templates to cut wooden bits
- Paint
- Assemble
But very quickly, I realised that this process was going to be quite a different kettle of fish… It suddenly dawned on me just how two-dimensional our masks actually are. Yes, they have different levels, making them three-dimensional (bear with me!), but being wall-hangings, they only have to look appealing from the front. However, we wanted our new standing giraffe to be more sculptural — taking centre stage in a room and looking good from any direction.
A humble little pencil sketch was certainly not going to do the trick…! How would I relay what I wanted carpenter hubby, Alex, to cut if I didn’t know how multiple angled pieces would join and appear from various angles?!
After pondering this predicament for days, my only half-decent idea was to ask my mom to courier my brother’s childhood lego collection. But building it using lego wouldn’t work either — I needed to be able to shave off tiny little bits to make slight adjustments. The lego-idea must have stirred up an archived memory, because suddenly inspiration struck: Play dough! My mom used to make me play dough all the time when I was a kid. After a quick chat with mom and a bit of Googling, I found a super simple recipe that I could slap together with ingredients that I already had in the pantry.

I cannot properly put into words how incredible it was to make the first batch of play dough… The smell!!! Suddenly, magically, I was eight again! I became all teary-eyed and nostalgic, waving a handful of play dough under Alex’s nose, shouting, “This is what my childhood smelt like!”. And yes, I also tasted it, since I remember secretly eating quite a bit of it as a kid. My childhood sure tastes salty and disgusting!
So, the play dough idea was a stroke of genius, and I was able to build half a giraffe head on our kitchen table. Then, I traced these pieces with pen and paper and continued with step 2-8 of our mask-creation process.
But we were not out of the woods just yet! We had to make a whole bunch of alterations, which required certain bits of the face to be completely rebuilt - first in play dough and tested with the wooden bits that were already in place, traced onto cardboard, wood recut, refitted… The head of the giraffe was by far the most time-sensitive of the entire process. But we knew how important it was — it would definitely set the tone for the rest of the development process, both energetically and aesthetically.

We finally moved on to the neck. By this point, the logistics of designing the head had gotten me so exhausted, that I drew a rough sketch, we discussed basic measurements, and I handed it all over to Alex with a very blasé, “this bit is your problem now”. While the conceptualisation was relatively simple, the actual build was super tricky. Alex had to create various ‘jigs’ to enable him to cut the extremely sharp angles on the very long pieces of wood with his pretty basic carpentry tools, which took a lot of brainpower and time.

The moment we were able to attach the head to the neck was the moment I became really excited about our giraffe’s potential. “This could be friggen cool”, I thought. If only I knew how much work and panic still lay ahead…
It was time to go back to the drawing board, literally. I made various sketches of the body design, using photos of giraffes from various angles. I even used an anatomical drawing of its muscles! So, we were attempting to be pretty anatomically correct, while maintaining the unique minimalist, cubist style of our masks, and adding a little creative zing! I decided pretty early on that I wanted it to be possible to peep into the giraffe’s chest cavity, and that she would have a heart! So we needed to leave strategically placed gaps to make this possible, as well as letting in light so that it’s actually visible.

Switching to 3D, the play dough would no longer cut it: It was just too floppy and thick to build a giraffe carcass! So, I spent a couple of days building a mini version of our giraffe out of cardboard and good old cello tape. I used a flattened toilet paper roll to represent the neck, and slowly added bits that mimicked the anatomy of the giraffe.

By now, it was early May. Panic set in. Decorex was just a month away, and our giraffe was a mere floating head and neck, currently suspended from a ceiling beam over the kitchen table… It was time for drastic, brave (almost foolhardy) ACTION!
With my mini giraffe guiding the process and a stack of discarded boxes as my material, I started to create cardboard replicas to fit the Real Twinka. As soon as a piece looked halfway-decent, I passed it over to Alex to create its wooden replica. Our motto became, “We’re probably going to have to redo this a few times. So let’s just be brave and try.” And boy, did we try. A LOT.


Feeling stuck: I spent quite a bit of time just staring at Twinka, unsure of how to proceed... Here (rocking my Hogwarts pyjamas), I've realised that her newly-attached body looks too wide and will need some serious adjustments!
When Twinka’s back and shoulders were done, she had to be suspended from a ceiling beam in the middle of the living room - the only place in our little cottage that could fit her 2.5 meter height. The dining room table was nonchalantly moved out of the way, replaced by tools, piles of cardboard off-cuts and debris. During all of this, Alex continued to teach drumming lessons from the second bedroom in our place. For weeks on end, Twinka welcomed students (and their shocked parents!) into our pig sty, butt-first (could we not have thought to turn her the other way around to show off her good side?!).
At first, I hid in our bedroom like the true introvert I am, avoiding yet another apologetic explanation. Later, when I could feel our deadline breathing down my neck, I just sucked it up, staying exactly where I was perched in front of Twinka (in my fat pants and woolly slippers) trying to tape a new piece of cardboard to Twinka’s growing body, smiling stupidly as if I didn’t have a giant giraffe standing between my legs)…


When we shot the ridiculous pics of me in my onesie with the yet-to-be-painted Twinka - a collection of images that my followers absolutely loved - I wasn’t trying to be funny or cute. The God’s honest truth is that, at that stage, I flopped out of bed every morning, put my panda bear onesie on over my pyjamas (because it was friggen cold!), and leopard crawled over to Twinka to start working, often just staying dressed like that until it was time for my evening shower (hey, at least I took daily showers!).

Twinka's intricate chest was really challenging, and I redesigned and rebuilt it using cardboard at least five times before it was ready to be cut from wood.

Alex's face says it all: "It doesn't fit... Again!" A major challenge when creating something hand-crafted, using recycled wood, is that no two pieces are exactly the same. We were so happy with Twinka's right side, but replicating that on her left side was no small feat.

I played around with various options to create the little peep holes on either flank (enabling the viewer to look into Twinka's chest and belly cavity). I decided against this design since it felt too... skeletal. We eventually settled on adding a solid belly piece that created a very pretty triangle to peep through.

My three favourite shots from the infamous "onesie shoot". Twinka is about to be painted!!!
When Twinka was finally ready to be painted, it was 1 June. Set-up for Decorex was just four short days away… For the next few days, I lived on tea and hope.
First, I planned which sections of the giraffe would remain unpainted. I plop little stickers onto pieces of wood that are really characterful and beautiful. The rest get a coat of black paint. Even this seemingly silly little layer is painted by hand — spray paint is expensive, unable to achieve the same coverage on the sometimes very rough recycled wood and just awful for the environment!


Late night shenanigans...
Of course, somewhere in the midst of all of this, I got a bizarre brainwave: Apart from having a heart, suspended from the top of her chest-cavity, how cool and deliciously weird would it be to also add a blue sky and white clouds to the inside of Twinka’s belly?! Mu-ha-ha-ha-haaaaa (that’s my mad scientist laugh, in case you were wondering)! Alex, knowing better than to argue with his deranged, artsy, exhausted wife, dutifully redid Twinka’s insides, altering and even removing many of the structural pieces of wood that held her together, making space for my absurd idea…

Then, I planned the colours. I painted right through the night, two nights in a row to finish this final flourish. Remember, Twinka had to be disassembled for me to paint all her bits, so Alex still needed enough time to reassemble her and for us to make adjustments and final touches. Like her tail hair, made from an old t-shirt, and her absolutely fabulous eyelashes, made from old, rusted nails. The latter was an idea that I had early on (already featuring in the very first sketch!) and almost scrapped right at the end, because I just couldn’t fathom standing up any longer, never mind styling a giraffe’s lashes… But once again, my brilliant husband stepped up and took charge, beautifully crafting a characteristic that soooo many people commented on at Decorex!


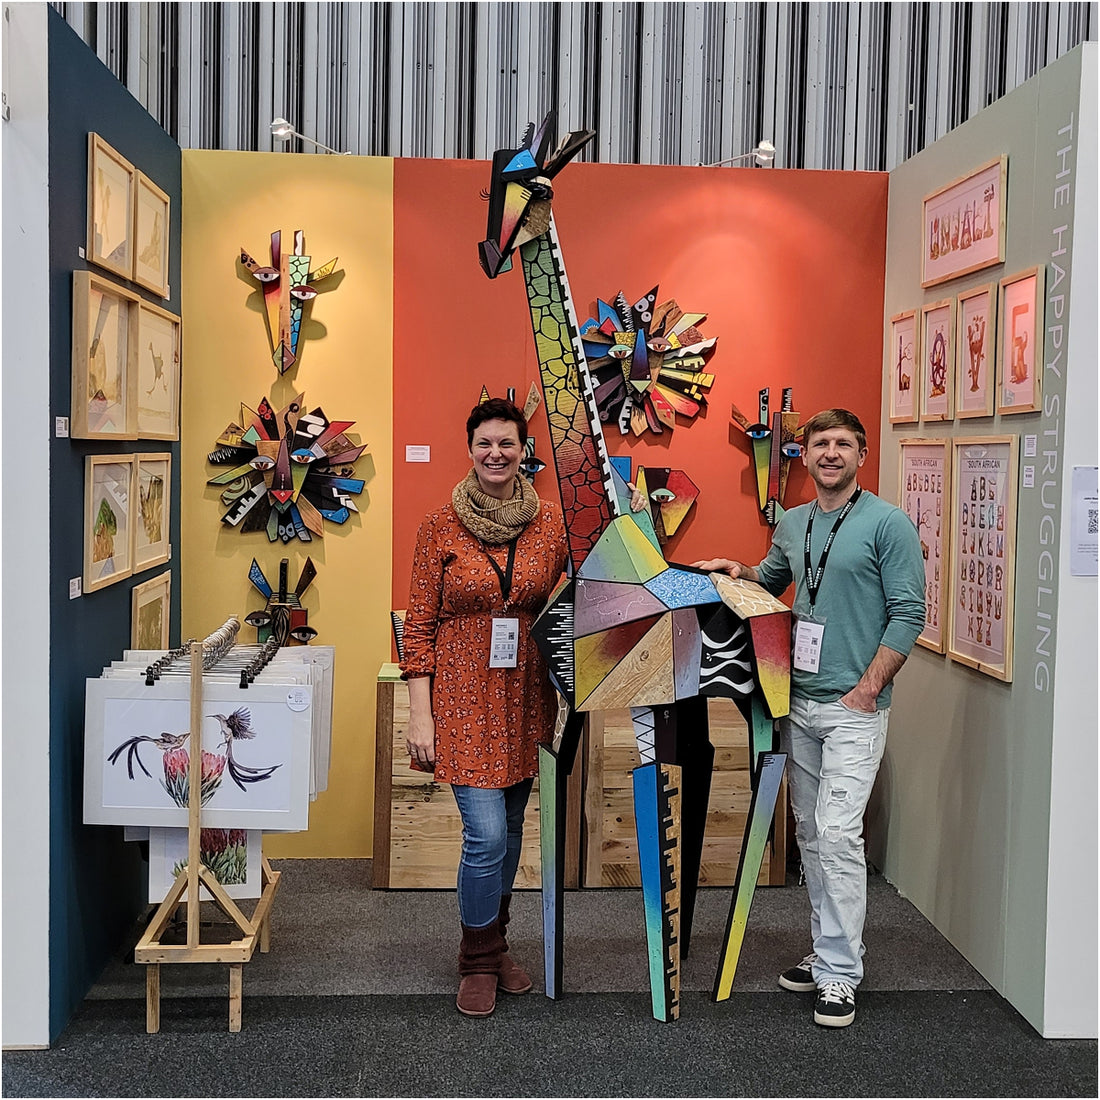
With literally hours to spare, Twinka was ready for the show.
The poor thing had to part with her head and lower legs one last time to fit into our bakkie… but she gathered herself towards herself in time to make her debut. And WHAT a debut it was!

Left: Packing time! Choosing some favourites from our vast collection of wooden animal masks to take with to Decorex.
Right: Tight fit... Twinka is IN (along with eeeeverything else!).
I told and retold the story of Twinka's creation (or a shortened version of it!) over and over during the four days of Decorex. And no one listened under duress, mind you — Decorex delivered the nicest, most engaged visitors that I have EVER experienced!!! Twinka blew people away! My favourite part was telling them to look inside her belly and hear the delighted utterances when they noticed her scarlet heart and its partly-cloudy, blue-skied surrounds. Thank you, Dr Jekyll, for the last-minute, inspirational madness…!


So, what’s next for Twinka?
For now, she’s BACK IN THE MIDDLE OF OUR LIVING ROOM!
Later this year, she will be on proud display at the stunning Spier Craft Art market just outside Stellenbosch, eagerly waiting for someone to invite her to live in their home. But before that, we'll have to make some clever adjustments to enable easy overseas shipping, AND build two smaller versions that can fit into “regular-sized homes". Like ours...
And in the meantime, she might just make an appearance at a couple of exhibitions/competitions.
Watch this space!